While technically not the correct use of the word "trifecta" the idea here is to combine 3 unrelated cooking methods to achieve perfect fall apart ribs.
- 3 hours of smoking
- 30 minutes of pressure
- 3 minutes under broiler (twice)
To follow these instructions you'll need some tools, but a few steps are also sort of optional. At a minimum you'll need a pressure cooker. When it's cold out I do the final step on the Broiler, but on a nice day I use the grill. The smoker is optional for success but is also essential for total victory.
- Smoker
- Pressure Cooker
- Broiler (or Grill)
I combine a few proven techniques to get the best possible results with the least amount of effort. To be comprehensive I have tried to include as many relevant details as possible.
|

|
Controlling the internal temperature of the ribs is the most important part, but here is a summary of how to get the best results.
Obviously you'll want some sort of smoker. I don't have a smoker per se, but lots of people use a regular grill to smoke. In my case I use a (natty) gas grill, but you could use a charcoal grill. Encapsulate the ribs in smoke for 3 hours with the heat well below 200°. How you get the smoke on to the ribs is up to you but I'll show you how I do it.
Absolutely you will need a pressure cooker. You could smoke and/or grill the ribs all day (8 hours?), but who has that much patience?. Some people just use a pressure cooker for an hour and skip the smoking and broiling altogether, but what fun is that?
Under a good broiler, I like to char the sauce on to the ribs. A grill or oven will get the job done. Remember, sauce burns easy.
|
|
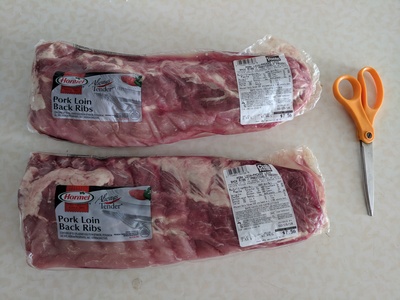
We start with a couple of full racks of baby back ribs. At my local Cub they're 2.5 to 3 pounds per rack and are generally $7 to $13 each depending on sales.
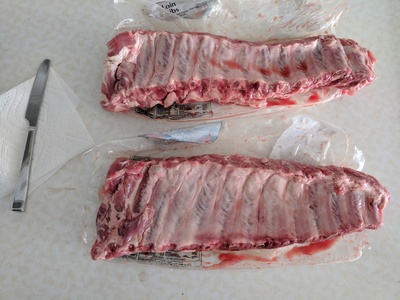
These ribs come sealed in plastic, which is actually pretty handy. You can buy these racks on sale and stick them in the freezer. When you're ready they should take about a day to thaw inside these bags, and without spilling pork juices all up in your fridge. What I do is cut open each end of the rack. Then I hold it over the sink and let most of the raw pork juices go down the drain.
Once most of the juices have been drained, I cut the plastic all the way down the side of the ribs and butterfly it open to protect my counter.
|
You'll need to remove the membrane from the under side of the ribs. This takes a bit of practice but is generally pretty easy. For this step you'll need a piece of paper towel and possibly a butter knife. If you cook the ribs with the membrane still attached then the ribs will have an unpleasantly tough layer on the under side.
Look for loose pieces of membrane sticking up on either end of the rack. Worst case Ontario slide the butter knife under the membrane to break the surface. Once you have a loose piece of membrane take the paper towel and use it to grab the membrane. Peel the membrane up as much as possible. Don't worry when it breaks off. Once you get some membrane off the rest of that rack will be easy, just keep grabbing it with the paper towel. The peeled up membrane will be gross and should be discarded.
|
|
|
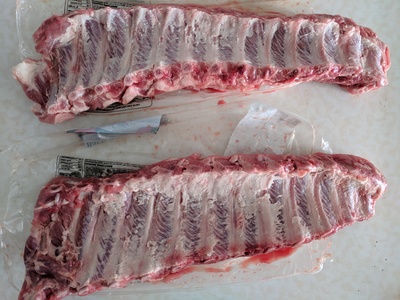
Next take some scissors and trim off any loose fat and connective tissue. Don't worry too much about it but pieces hanging off the ribs will just get ugly as time goes on.
The photo on the left shows what the back of the ribs should look like once the membrane has been peeled off.
For my smoking technique I need to cut the racks in half. Your smoking setup might be large enough for full racks, but you'll still need to cut them in half in order to fit the pieces into the pressure cooker. Take a sharp knife and cut along one of the bones in the middle of the rack. Sometimes I'll bend the rack in half to find the middle point. Every rack is a little different so do your best and don't worry about a little variance.
|
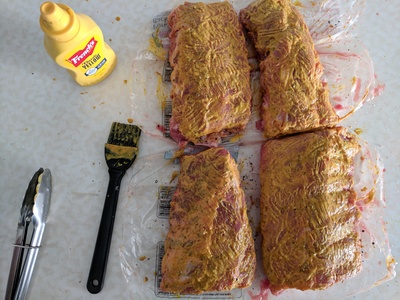
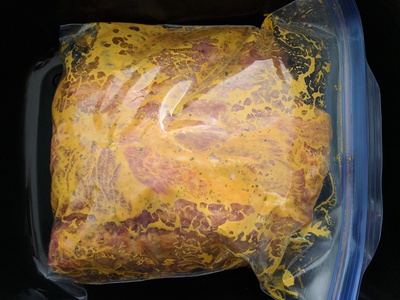
Now it's time to season the ribs. For nearly all the meat I cook I use freshly ground pink himalayan salt and a peppercorn blend. You could use regular salt and pepper. I apply the salt and pepper to both sides.
Next I cover the ribs in yellow mustard. A friend of mine told me that it helps the ribs absorb the smoke. I've read that it helps get the rub to stick. I don't use a fancy rub so maybe this is a waste of time. For now though I'm sticking with it, gotta do some more research. I apply the mustard to both sides of the ribs.
|
|
|
Another nice thing about cutting the racks in half is that you can fit two full racks of baby back ribs into a one gallon freezer bag. This makes it easy to handle on the way to the smoker without making a mess.
Once you've got the ribs in the bag it's time to clean up. Generally speaking you should always dedicate one of your counter surfaces to raw meat. Raw meat contains foodborne pathogens. By dedicating a counter surface to raw meat it will prevent cross-contamination with other food items and greatly simplify cleanup.
Now that your ribs are bagged up and ready to go it's time to clean your raw meat counter.
|
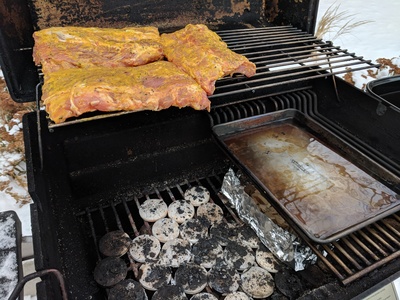
I don't have a smoker but I rig up indirect heat on a (natty) gas grill. The ribs go on the left side and the heat on the right side.
On upper rack (cold side) I arrange the 4 half racks of ribs. On the lower rack (hot side) I put an old pan filled with water. The water dampens the heat, and seems to povide moisture inside the grill. I remove the lower rack from the cold side so I can get at bottom (hot side) and push wood chips around, in this case using foil.
It's worth mentioning that whatever pan you use in the grill will likely be damaged, so don't use anything fancy.
|
|
|
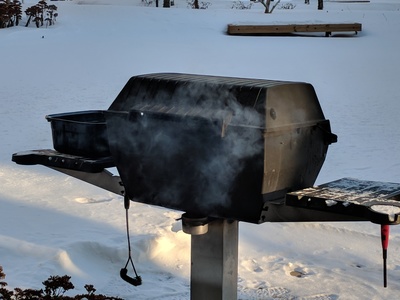
Once the wood chips heat up they should start smoking and you'll see that smoke pour out of the grill.
|
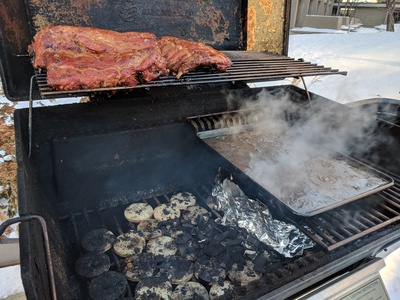
Keep an eye on the grill and when the smoke stops you'll want to check the wood chips. It's possible that you'll need to add more, it's also possible that you need to adjust the position of the chips. You want them to smoke, but not burn.
While you're checking the chips it's a good idea to top off the water. You don't want to run out or you'll lose the heat dampening effect and moisture.
|
|
|
Each time I check the wood chips and water I tend to rotate the half racks. Since I have indirect heat from 1 side it tends to be uneven. You don't want to overcook any part of your ribs.
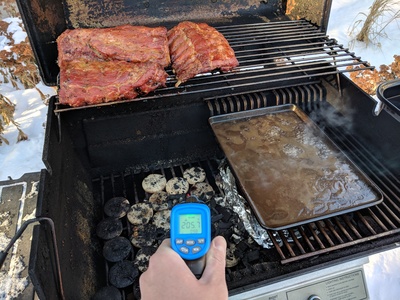
If you have an infrared thermometer, it's a good idea to check the temperature on the cold side, it should be well below 200°.
I usually add wood chips, water, and check the temperature about once an hour. If the smoke stops more often then I check it more often. But it's generally a good idea to keep the grill closed. Resist the temptation if you can.
|
|
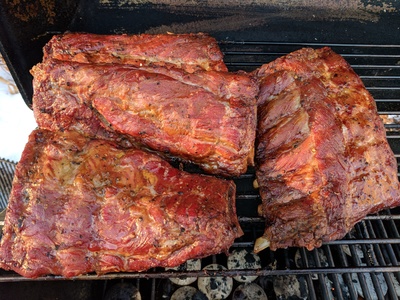
I smoke the ribs for about 3 hours and then take them to the kitchen.
|
|
|
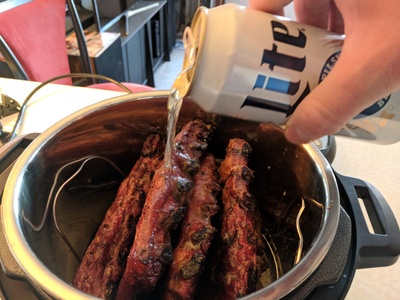
Put the metal rack in the bottom of the pressure cooker to keep the ribs out of the liquid.
Dump a beer over the ribs as evenly as possible, no rib left behind.
|
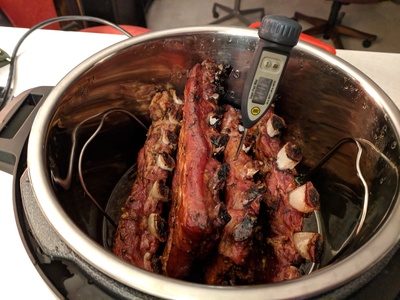
Cook the ribs for 30 minutes on high pressure. Once the 30 minutes is up pre-heat your broiler.
Allow the pressure to vent naturally for 10 minutes, or if you're impatient you can cover the vent with a towel and let it rip. Your place will get a beer and ribs smell, which is not unpleasant.
At this point the internal temperature of the ribs should be around 200°.
|
|
|
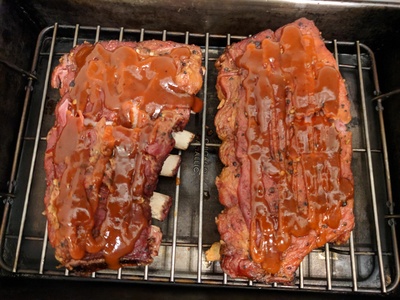
Now it's time to sauce the ribs. First place the ribs in a roasting pan, preferably with a rack. Be careful pulling the ribs out of the pressure cooker, they'll likely fall apart.
I use a combination of Sriracha and Devil's Spit BBQ Sauce. Use a brush to evenly apply the Sriracha to the ribs. Next apply the BBQ Sauce and use the brush to spread the sauces all over the ribs.
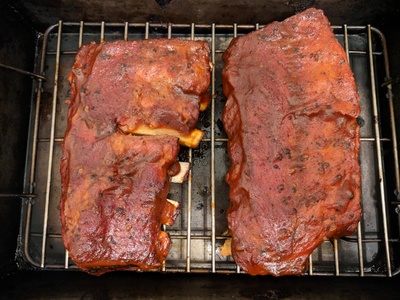
Once the ribs are coated put them under the broiler for 2 to 3 minutes. Sauce them a second time and then put them back under the broiler for 2 to 3 minutes. They'll probably get a little bit of char if you go 3 minutes under the broiler both times.
|
|
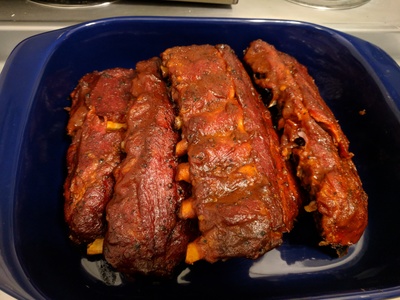
Now the ribs are done. If you did everything right these ribs should be amazing.
|
|
|
People say you should let the meat rest, good luck with that.
|